Risk assessment and decision-making when freeriding

06.09.2023

When deciding whether a freeride run is possible or not, a basic understanding of what makes a descent dangerous is crucial. Every freerider can and must decide for themselves what risk they ultimately take – i.e. whether to ride or not.

This article is about:

Risk assessment in freeriding is clearly based on the GKMR (danger/consequence/measure/risk) model developed by Chris Semmel and Benjamin Reuter. “Classic” reduction methods (Snowcard, GRM, Stop or Go, etc.), which only relate slope gradient and danger level, are impractical to impracticable in freeriding. On the one hand, freeriders are often in constantly used terrain, and on the other hand, the “classic” reduction methods do not take the terrain into account. However, in freeriding in particular, the permanent evaluation and best possible use of the terrain to reduce risk is standard.

Thinking in terms of danger and consequence is systematized in the general definition of risk. It is made up of the probability of occurrence of a certain danger and the extent of damage, which together result in the risk. This risk can then be reduced or avoided with appropriate measures.

When it comes to risk assessment in freeriding, everything usually revolves around the danger of avalanches. Other, much more probable dangers are often ignored. However, these must also be taken into account in a good risk assessment. For example, poor visibility, complex terrain, low snow cover, cold, wind and other parameters can be much more threatening than the avalanche risk. These risks can be reduced by taking appropriate measures – warm clothing in cold weather, a defensive skiing style when there is little snow, only skiing down complex terrain in the company of good skiers. If in doubt, choose a different route or stay on the piste or at home.

This article is primarily concerned with risk assessment and decision-making with regard to avalanche danger: With recourse to the above-mentioned definition of risk, the avalanche probability (danger level/avalanche problem) can be set in relation to the consequences (what if?), which makes an initial risk assessment possible.

Ideally, a freeride day should be planned with the whole group. Everyone involved should know all the information about the planned project and start the (next) day with the same knowledge.

01

Avalanche probability

You can get an initial assessment of the avalanche danger by taking a look at the avalanche forecast the day before. In addition to the danger level, the avalanche forecast provides information on the prevailing avalanche problems and where they are most likely to occur – altitude, exposure and possibly also the time (morning/afternoon) are indicated. If you take a closer look, you will also receive information about the avalanche problem, the stability snowpack stability, the frequency of the danger spots and the expected avalanche size. Depending on the characteristics and avalanche problem, initial recommendations for action can also be derived from the forecast. Although this avalanche forecast is “only” valid for the region – i.e. it is not specifically tailored to “your” slope or “your” descent – it is ideal for planning. Some lines will have to be excluded from the outset due to the problems described in the avalanche forecast.

In the field, the forecast avalanche and weather situation is then compared with the actual situation on the mountain. A targeted search is made for danger signs and other features that allow conclusions to be drawn about the actual situation and how it matches or differs from the forecast

Typical observations can be

  • Actual amount of new snow.
  • Traces of fresh avalanches.
  • Wind signs such as snow plumes, dunes or sastrugi.
  • Alarm signs such as whumpfing collapsing sounds or cracks.
  • Fresh tracks that you observe from the lift, for example, can provide information on snow quality (bound, loose), subsoil, moisture penetration, etc.
  • The exchange with other freeriders and even more experts on site (piste rescuers, operations managers, blasting experts …) is extremely valuable! On the mountain, competition should be replaced by cooperation.
02

Consequences

In order to realistically assess the risk associated with an avalanche, two things need to be taken into account: One is the probability of an avalanche in which you could be swept away; the other is what the consequences are for you. For the latter, the terrain is the decisive parameter.

The crucial question is always: “What if …

  • … I am caught in an avalanche? Is the area above me sufficiently powerful for large avalanches to occur, or are there terrain traps below me (bowls, rocks, collapses …) which could result in injuries or complete burial even in small avalanches?
  • … I fall? Again, it’s about terrain traps such as rocks or a stream bed that is underneath you.
  • … I injure myself? Do I have cell phone reception, is there flying weather so that a helicopter can land?
  • … I lose my group? Can I find the right route on my own, can I contact the others (cell phone, radio), do I have all the emergency equipment with me (bivouac sack, headlamp, first aid material)?

The most important factors for terrain assessment are:

  • Slope steepness: Avalanches can be triggered on slopes that are steeper than 30 degrees.
  • The size of the slope: The larger the slope, the larger avalanches can become.
  • The catchment area: Do other gullies etc. flow into “your” slope, from which avalanches can come?
  • The run-out zone: Does “your” slope run flat or does it end in terrain traps?
  • Possible danger of falling: Are there any slopes, rockfalls, craggy terrain etc. that you could fall into in the event of a fall or avalanche?
  • Good assembly points: Are there good, i.e. safe and clear assembly points in the area or do you have to drive long distances?
  • Terrain traps: The aforementioned steep drop-offs are terrain traps, as are ditches, bowls, stream courses, trees & forest, rocks, ledges on ski slopes/forest roads, which exacerbate the consequences in the event of an avalanche (or fall). For example, if you are caught in an avalanche that breaks off on a small slope above you and sweeps you into a flat free slope, not much will happen to you. If, on the other hand, a huge slope breaks above you and sweeps you into a stream bed, you will be buried several meters deep (even with an airbag).
  • Crevasses: Especially in early winter, there is a high risk of crevasses falling in open glaciated terrain in glacier ski areas! At this time of year, the crevasses are not yet solidly covered, but are often only covered with a thin layer of snow, which makes them difficult to see.
  • Clarity: Is the site clearly laid out and easy to find your way around at all times, or is it easy to end up in a dead end and miss important entrances/exits?

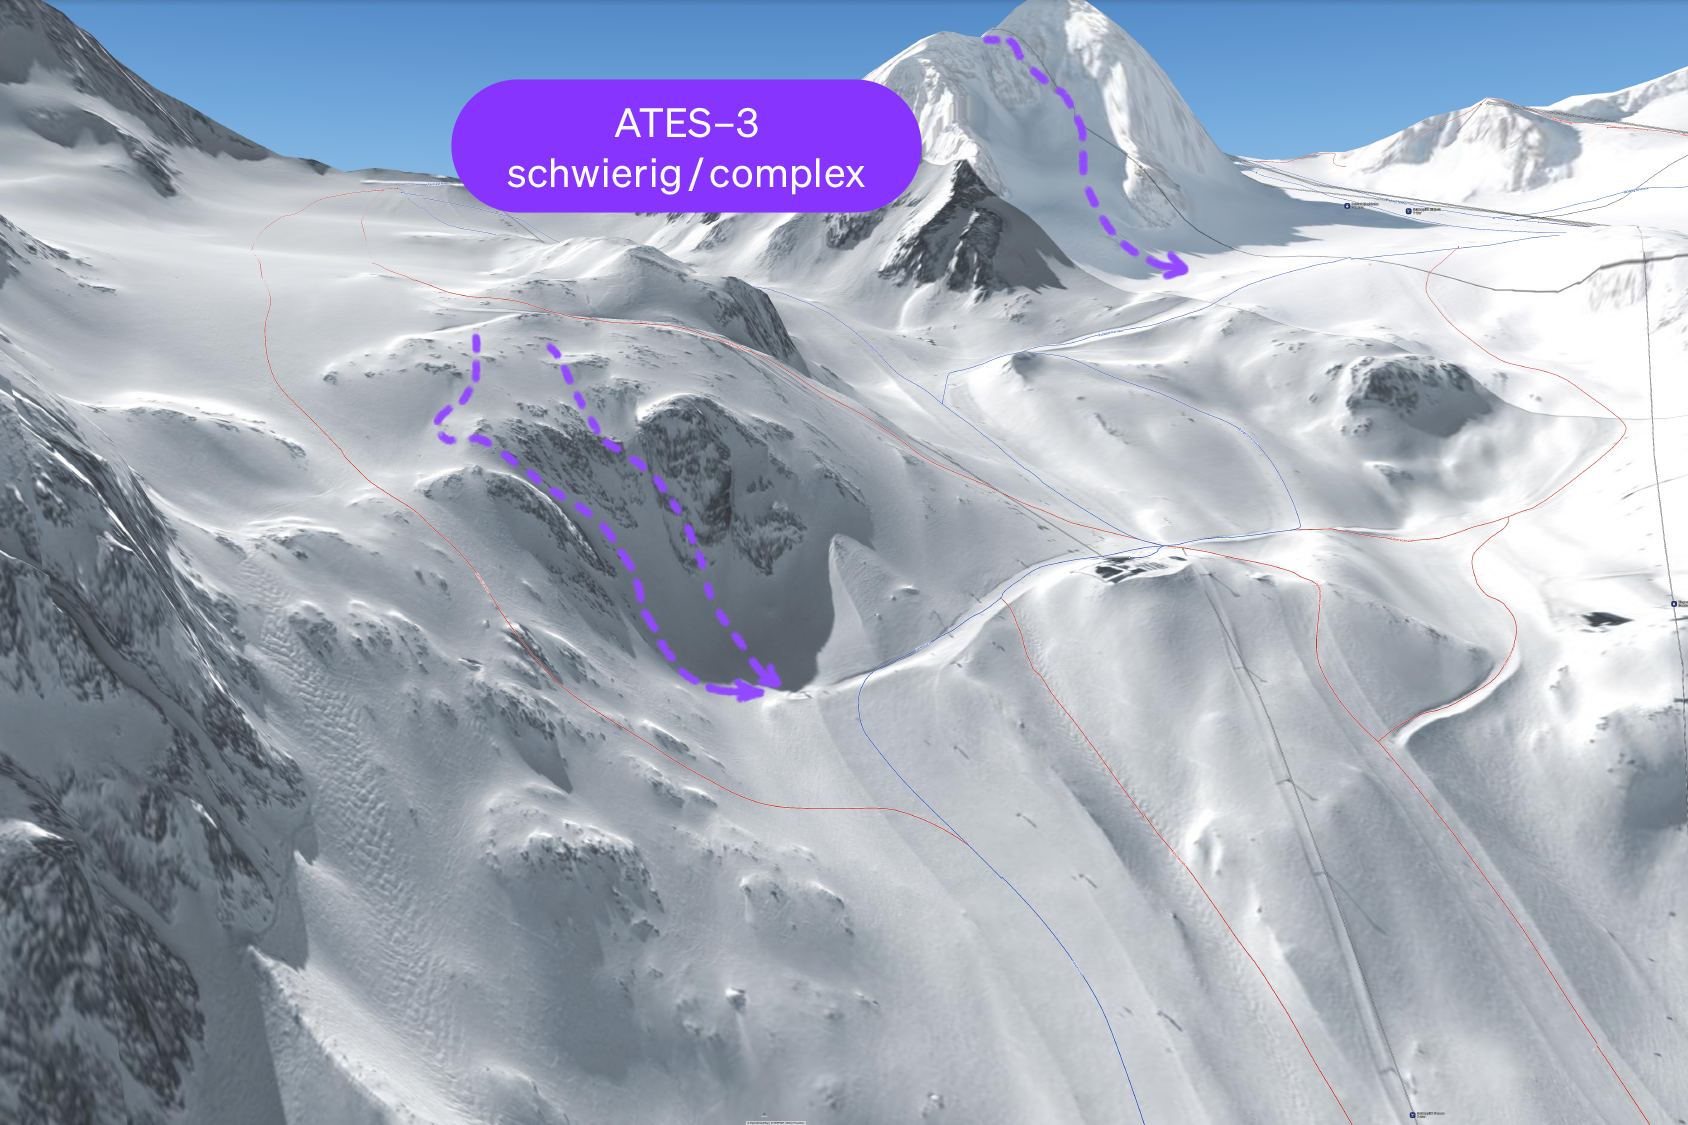
At the end of the assessment, we should be able to classify the site into one of the three ATES classes:

ATES overview © snow institute

The Avalanche Terrain Exposure Scale (ATES) from Parks Canada classifies the terrain – and not the snow layering – in terms of potential avalanche danger. Corresponding terrain maps are common in North America and are also slowly becoming more widespread in the Alpine region. They are ideal for classifying the avalanche risk in open terrain into the following three categories at a glance:

ATES class 1 © snow institute

EASY/SIMPLE: flat terrain below 30 degrees, no significant catchment areas, no risk of falling, easy orientation, close to infrastructure (lifts)

ATES class 2 © snow institute
DEMANDING/CHALLENGING: steeper terrain passages over 30 degrees, catchment areas must be observed, rocky sections in places, meeting points not always easily possible, orientation necessary during the run
ATES class 3 © snow institute
DIFFICULT/COMPLEX: very steep or extremely steep downhill areas over 35 degrees, large catchment areas, risk of falling, good meeting points often not possible, difficult line finding and orientation, terrain traps and obstacles in the run-out area.
The Avalanche Terrain Exposure Scale (ATES) from Parks Canada classifies the terrain – and not the snow layering – in terms of potential avalanche danger. Corresponding terrain maps are common in North America and are also slowly becoming more widespread in the Alpine region. They are ideal for classifying the avalanche risk in open terrain into the following three categories at a glance: Stet clita kasd gubergren.
03

Risk

The prevailing avalanche danger, or more precisely the probability of an avalanche occurring, and the resulting consequences, i.e. the expected extent of damage, ultimately determine the risk. You cannot change the avalanche danger, but you can adapt the choice of terrain to it. If you want to ski challenging runs and lines and keep the risk within an acceptable range, you need the right, safe conditions. If a risk assessment has been carried out based on the conditions and terrain, the risk may be acceptable for you, i.e. you can ski. If, on the other hand, you consider the risk to be too high, you must either take measures to reduce the risk to the desired level, or you must forgo the run and choose a different line or stay on the slope.

Especially after snowfall, it is often necessary to simply wait for a while until the situation stabilizes and it is possible to ski downhill in safe conditions.

In addition to the situation-related measures, the following standard measures must always be observed:

  • Only ski with complete equipment and after an avalanche transceiver check,
  • Drive individually or maintain large distances,
  • Choose good collection points,
  • Clearly define and communicate departure corridors,
  • Ride in the buddy system,
  • Open communication,
  • Clear feedback round after the run/day (what was good, didn’t go so well, do we need to change or do better next time?)

TAKE AWAY: The result of the risk assessment may be that no measures can be found that allow the group to navigate with an acceptable level of risk. In this case, abandonment is the only sensible measure!

In addition to the avalanche situation and the terrain, there are other elements that are also relevant to the risk. You must keep these in mind once the risk assessment has been completed.

The group

The experience and level of training of the group, or more precisely the degree of personal responsibility with which each person is traveling, determines the level of risk that can be taken. If everyone knows what they can do and what they are doing, is aware of the possible consequences and accepts them, it is possible to take a greater risk.

The so-called protection target for group members who are unable or unwilling to decide and act independently, on the other hand, is much higher. In this case, you will have to give up or reschedule earlier. For example, in the guided area or whenever you take responsibility for others (in the training area, as a ski guide, when children are involved …), a significantly lower risk is permissible than in the private area.

In your own interest, a higher risk should only be taken with group members who know exactly how to react in an emergency. Relevant questions to assess this are, for example:

  • Do all group members know how to behave in the field?
  • Are the distances actually maintained?
  • Can everyone handle an avalanche transceiver, shovel and probe?
  • Is the skiing ability of the individual group members sufficient or should longer breaks and delays be expected?
  • Can anyone make an emergency call?

Organized rescue

The more exposed the terrain, the more important it is for the other members of the group to help. After descending into a remote valley with no cell phone reception and no view of the ski area, help will not arrive in time to dig out a buried person within 15 minutes after an avalanche.

In contrast, things look better in the variant area close to the slopes. Slope and organized rescue is alerted more quickly and is quickly available, often an avalanche is observed by others and the rescue chain is set in motion, i.e. ideally a rescue helicopter is sent. However, a helicopter mission is only possible under certain conditions such as good visibility, flying weather, availability, etc.

In adverse weather and visibility conditions or when driving off-piste in remote areas, it must be taken into account that the rescue services may be alerted much later or not at all. The risk increases accordingly if you cannot rely on external help.

Cover picture: © snow institute | LWD Tirol